Hey there, future diaper-changers! Fantasizing about that Pinterest-worthy nursery for your newest, tiniest family member? Creating a nursery isn’t just about the cute stuff (though, let’s be honest, it’s a big part); it’s also your mental prep for the sleepless nights ahead. Trust me, I’ve been there twice! Let me help you ease into this journey of turning a plain ol’ room into the baby haven you’ll swear by in every Facebook post.
Step 1: Planning and Design
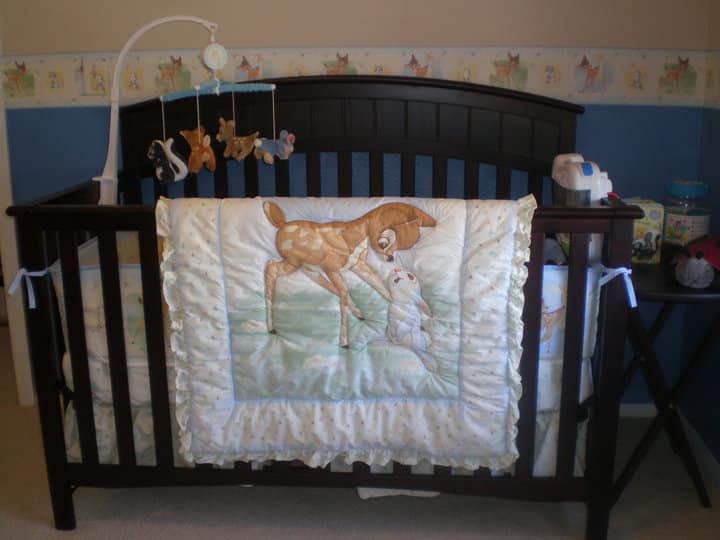
When I started planning for both of my boys’ rooms, I had a plan. Well, I mean, I had an idea, and that is kinda like a plan, right? For my firstborn, I went old school Disney with a Bambi theme – and damn, was it cute!! I had to scour the internet to find it all the pieces, they were hard to find!

For my second born, I was less fixated on a theme and more interested in a color combination. You can check it out in my Orange and Teal Nursery Reveal post!
What’s your style? Chic and minimalist, or bright and chaotic like a toddler with a crayon? Whether you’re thinking Scandinavian calm or Disney princess overload, having a theme will save you from endless decisions. Pinterest boards, Instagram hashtags, and yes, even magazines (remember those?) are your new BFFs. This is your chance to be as creative as you were when naming your Wi-Fi network.
Essential Elements:
- Safety First: Non-toxic everything. Yes, even the stuff you think they can’t reach—they’ll find a way.
- Functionality: This is your command center. Think NASA, but with more diapers.
- Comfort: A comfy chair is essential. You’ll be spending more time here than you did binge-watching the latest Netflix hit.
Step 2: Furniture Fundamentals
Let’s talk furniture: crib, changing table, and a chair that doesn’t make you want to cry at 3 AM. The crib isn’t just a bed; it’s their first little fortress. Go for sturdy and stylish because it’s your new favorite Instagram backdrop. Changing tables with storage will save you from midnight scavenger hunts for wipes. And that chair? Your future self’s back will thank you.
Step 3: Palette and Patterns
Colors and patterns are the mood-setters here. Want a zen den? Soft blues and grays. Feeling more adventurous? Maybe a wall that screams “Welcome to the Jungle.” (And if you’re insane like I was and ambitious in wanting to paint horizontal stripes on the wall – well, I hope you have less stress than I did!)
Wallpaper is your non-committal bestie—go wild without the paint spills. For inspiration, check out this page for some of the fantastic designs. The nursery should be your calm amidst the chaos, so pick colors that soothe rather than scream.
Step 4: Let There Be Light
Good lighting is like the secret sauce in your nursery setup. (You can trust me on this, my cousin is an Emmy-winning lighting designer, and I run ALL my illumination choices by her.) Think soft, warm overhead lights for a gentle glow. Add a lamp with a dimmer switch next to your chair for those late-night feedings. And maybe some fairy lights, because why not add a touch of Hogwarts magic? Soft lighting helps both baby and you drift off, and let’s face it, you need all the help you can get.
Step 5: Soft Furnishings and Textiles
This is where you crank up the cozy. Think washable, because life happens. A plush rug, blackout curtains, and breathable cotton sheets are your essentials. Throw in some vibrant cushions because practicality doesn’t have to be boring. These details don’t just look good—they make the space feel like a cozy sanctuary for those precious moments (and endless laundry cycles).

Step 6: Storage Solutions
Babies are small, but their stuff isn’t. From onesies to toys, you’ll need storage. Floating shelves, under-crib drawers, and decorative baskets are lifesavers. They keep things tidy and accessible, so you’re not digging through piles at 2 AM. A well-organized nursery equals a more zen parent.
Step 7: Personal Touches
Now, for the fun part—making it yours. Family photos, quirky art, or a shelf filled with your childhood books add personality. This isn’t just a room; it’s the starting point for countless stories and memories. Make it a space that tells your family’s story, even if that story involves a lot of baby spit-up.
Step 8: Baby-Proofing Like a Pro
Safety isn’t optional. Secure all furniture to the walls, cover outlets, and tame those wild cords. The crib should be a minimalist masterpiece—no plush toys or heavy blankets. And yes, a baby monitor is a must-have. It’s like having your very own Jarvis, minus the snark.
Step 9: Growth Spurts Ahead
Babies grow faster than your patience on no sleep. Opt for furniture that evolves—a crib that becomes a toddler bed is gold. Plan for spaces that can transition from changing station to play area. Versatile furniture saves money and sanity, making your life easier while your baby makes everything harder.
Step 10: Crafting the Perfect Wind-Down Routine
Create a wind-down routine that’s your secret weapon against sleepless nights. A sound machine, a dim nightlight, and a stack of bedtime books can make all the difference. This routine helps signal bedtime to your baby and gives you precious moments of calm and connection.
Ready, Set, Create!
Take it slow and savor each moment of nursery creation. Involve your partner, friends, and family—turn it into a bonding experience. Remember, this isn’t just a nursery; it’s the beginning of a new adventure.

Bringing It All Together
Crafting a nursery is more than picking out decor; it’s about creating a space filled with love and memories. It’s where you’ll witness first steps, first giggles, and endless snuggles. Don’t rush—enjoy every choice, from the softest blanket to the most adorable teddy bear. You’re not just decorating; you’re setting the stage for your baby’s first chapters. Enjoy the journey, embrace the process, and make each decision count. Welcome to the chaos, the joy, and the magic of parenthood.
These are all great ideas, but I’ll do YOu one Better! Be sure to sign up below and grab this handy Guidebook, full of Nursery Crafts to DIY on your own!


