DIY Hutch Rehab
It is official – I have entered the world of furniture rehab. It is a dark, scary place…and utterly addicting.
Thanks to a friend who, for all intents and purposes, “peed” on a classified post, I was able to nab this wood/laminate armoire for FREE.
Seriously, it was FREE.
I haven’t been a fan of light wood furniture since my early college years, but I have wanted an armoire for our bedroom forever, and I saw potential. I was largely inspired by this wonderful post from Monica Wants It about rehabbing cabinets, and couldn’t get it out of my mind.
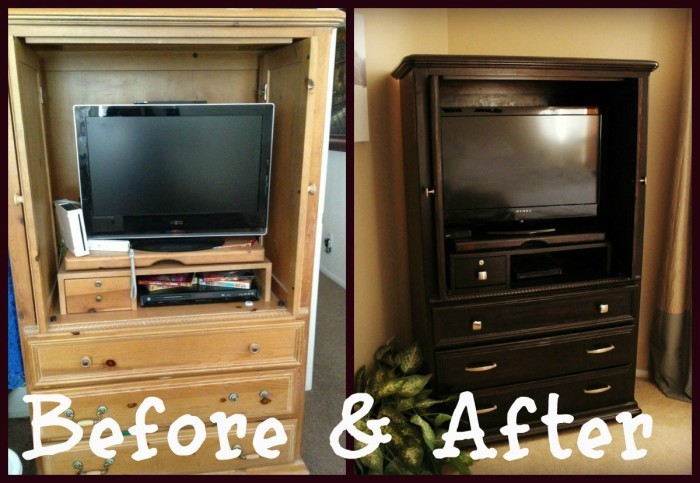
I wish I had the progress pictures…I remember taking them, but somehow I lost them. Afraid Before and After of my DIY hutch rehab will have to do. :/
I followed the instructions on the post pretty closely, including ordering the same beautiful Java Gel Stain. I tried her sock method for applying, but I ended up preferring to just use sponge brushes – I felt the sock just absorbed more stain than it applied. Since I am too impatient for these kind of jobs 90% of the time, that could have been the problem, rather than the sock.
Now, my final results were not quite as even as the ones on the post. First of all, the hutch was not fully wood – a lot of it was laminate. (Maybe another cause for the sock method not applying as much I’d hoped?) I did make attempts at sanding, but not sure I should have done that on all the pieces, since I ended up with some whorls and marks that stuck through. The hutch was also marked up a bit when I got it, but can’t really complain when it was still in great condition otherwise…and FREE. Besides, for my first furniture rehab, I have to make some mistakes, right? Where’s the fun otherwise?
All said and done, both my husband and I actually like the imperfections in the stain – gives the piece somewhat of a rustic appeal. (I fully admit that after weeks of working on this thing in my garage, towards the end, I may have just grown tired and said fuggetaboutit. Patience is something I have to work on in my crafty endeavors.)
Here’s a few more, since it turned out so pretty. 🙂
The hardware we replaced with knobs and handles from Lowes – I don’t recall their exact brand/item number, but they were brushed nickel…and a BITCH to put on. Turns out, the holes for the handles in the bottom two drawers were a goofy size – something like 4 and 1/4″ apart. Finding handles in that size proved nigh impossible! Ended up needing the hubby to pull out the drill and wood putty and make new holes for the handles we wanted.
It is a beautiful addition to my bedroom, and I love it! 🙂
Now to get to work on the entry bench from a rehabbed toybox I have lounging in my garage….
I love linking up at these parties , and at House of Rose!