This shop has been compensated by Collective Bias, Inc. and its advertiser. All opinions are mine alone. #InsideOutEmotions #CollectiveBias

OMG, I’ve been waiting for a stroke of genius to strike me on this topic. If you are a regular visitor here, you already know we’ve slowly been making improvements on our new home, little touches to tidy up, improve function and design, etc. I solved one toy storage issue with J’s toy car rail, but the stuffed animals were out of control.
I’ve been wracking my brain for months trying to think of a non-boring, creative solution for this problem, and was just coming up empty. Time for a mental break, wait for the genius to spontaneously hit me. That’s how it works, right?
Since movies help me to relax, I decided to treat J and I to a Mommy movie date and go see the new Disney movie, Inside Out. J was really looking forward to seeing it, and everyone knows I love a new Disney movie!

Movie Selfie!
I was a little concerned during the film that some of the concepts would be over J’s head. He’s only 4 1/2, after all. He seemed to be enjoying himself, laughing out loud and frequently calling my attention to something that had just happened. {This is where the discussion of not talking in movie theaters was urgently whispered!}
I absolutely adored the movie, and I saw a great opportunity as we left the theater to sort of delve into the emotional highlights of it with J. By far his favorite character was Anger – just my luck – and we had a little chat in the car about how our emotions change during the day depending on what is going on around us. J thought the idea of little emotions in his head was pretty cool, though I foresee some scapegoat issues in the future, lol.
In true “Mommy date” fashion, I capped off our outing by grabbing some groceries at Wal-Mart. See how much fun I am? As we strolled the store, we passed by a display in the aisle that immediately pulled J’s attention.

Oh boy. Mommy made a rookie mistake and cut through the store by the toy section. Silly Mommy! Well, there was no saying no to that adorable, pleading face. I consoled myself that we had just seen the movie together, so a memento was a sweet thought. Besides, I’d rather have Joy in charge than Anger!

On the way home, I realized I had inadvertently just added to my already obnoxious stuffed animal storage issue. ANOTHER STUFFED TOY! Good going, Mom.

Look at all those stuffed animals!
Never mind that one of his animals is bigger than he is, but the rest were just constantly being tossed to various corners of his room. Mama hates a mess!!
I was sure I’d never come up with anything creative, and I was OVER the mess. I grabbed another bookcase to match the one he already had in his room and threw it together, determined to be done with the deal, and mad at myself for not being “craftier”. Anger was in charge!
As I stood the bookcase up and began to give all the little plushies a new “home”, suddenly I got that light-bulb moment I’d been looking for. HOME! Ok, so it was a boring bookshelf, but it didn’t have to be! That bookshelf could be transformed into a “plush condo”, tying in beautifully with J’s current obsession with superheros! DING DING DING DING!!
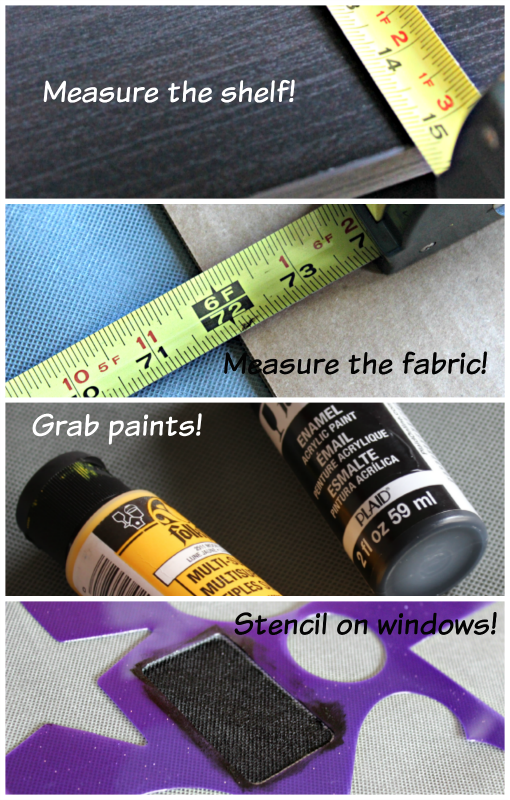
So here’s what you need:
Superhero Stuffed Animal Storage Cover
Fabric (I used a thin, cheap material that was advertised as perfect for superhero capes)
Double-sided tape
Acrylic paint in yellow and black
Rectangular stencil and foam brush

My shelf stood 57″ tall and was about 15″ deep. I added the two measurements together and cut six feet of fabric. It was folded in half already from the fabric counter, and that made it the PERFECT width for my bookcase.
I laid it out on my craft table and started stenciling on some windows.

I love that this takes no time at all, and you don’t have to (nor should you) paint every single flipping window. The effect is there. I started painting my windows 18″ below the top edge of the fabric.
I wanted the option to both hide the stuffed animals and also to let J have plenty of easy access to them. That’s why I made my fabric cut longer than just the front.
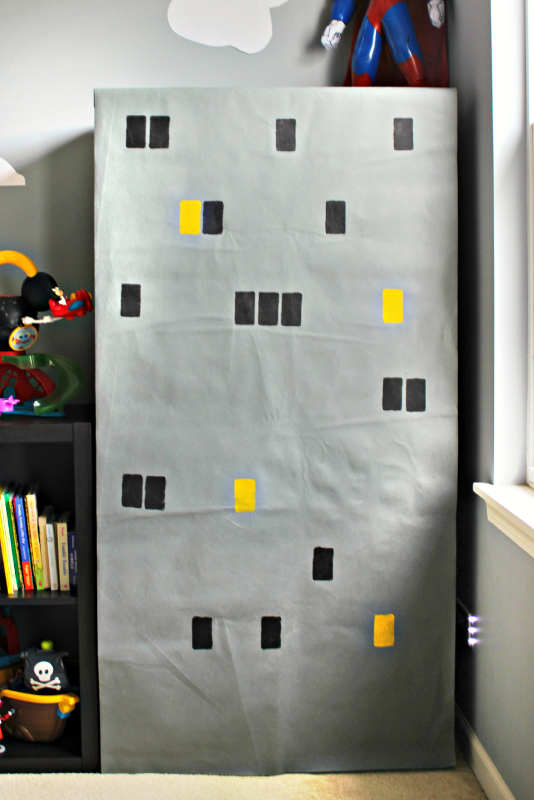
Using double-sided tape, I secured the top of my “condo” to the back edge of the top of the bookcase, and let it hang down over the front.

Voila!

I liked the addition of the white paper clouds, myself. I’m still working on some artwork for J’s poor blank walls, so this helped keep it from looking too bare.
And while I realize this is still essentially just a bookshelf for toys, I think you could add the creative cover to any style room! Paint a castle for a princess room, or a tree in a jungle theme. Possibilities are endless!
Best part is, you just roll up the fabric when you don’t want to see it!

Notice that the cars are on the bottom – or in the garage, if you will – while look who claimed the penthouse for himself!

Figures, lol.

I cannot even begin to tell you how much nicer it looks in his room without that pile of toys in the corner!

I love the little touches, like Spidey hanging off the side and Superman “leaping” the building in a single bound!
Well, it makes me giggle, anyway. 🙂
The best part though was J’s reaction. He thought it was the coolest thing ever, and immediately began pulling out his toy cars to drive around the “city in his room”. Talk about having Joy in charge upstairs!
What are some creative toy storage ideas you’ve seen?


I love linking up at these parties!

Hey, you are really a hard working person. Keep going and this post is too awesome it is fun to read this.