***This is a sponsored post. By this I mean I received free product to sample for the post. However, all the opinions are my 100% my own and are not influenced in any way.***

I have never ventured into making my own clothes, or anyone else’s. Sewing and I do not get along, as a semester of Costume Design in college taught me well. However, if there is a no-sew option, I am game to try! If you tell me I get to play with my Cricut at the same time?? Um…yeah. I’m there.
I was super excited to try my kit of Design Dye. For those of you who are unfamiliar (as I was), Design Dye is a kit of dyed papers that you can cut into the shape or design of your choice and iron on to fabric to create your own fantastic and unique patterns!
If you don’t own a cutting machine, no worries! While Design Dye papers are perfectly compatible in all popular cutting machines (Cricut, Silhouette, etc.), you certainly don’t need one! The kit booklet included some handy stencils to trace, or you could use paper punches or simply scissors and your imagination.
The Design Dye kit comes with everything you need, and at a price you can’t argue with – only $19.99! They include eight colors of dye papers, in your classic rainbow; red, orange, yellow, blue, green, purple, plus black and brown. They include two of each color, as well as two sheets of pre-cut Alphabet letters and numbers in black.

There is a thick sheaf of tissue paper included as well – these are used for the iron on process, but more about that below.
The kit also includes a Fabric Prep solution that is used to – shockingly – prep your fabric for the dye transfer. It is supposed to enhance the brightness of the transferred color and aid in the permanence of the transfer. Finally, they are 100% on the ball with a nice little manual chock full of ideas and tutorials on how to use their awesome product. The tracing stencils are in here as well.
This kit was perfectly timed, as I had the perfect project in mind! My son is obsessed with a few select Disney movies (cough, cough, CARS, cough), and since he owns a t-shirt or four that showcase his faves, he is partial to wearing them. Usually ONLY them. Getting dressed for daycare in the morning has had a few setbacks when he insisted on wearing one of his Disney shirts instead of any other boring old shirt in his closet. Now I’ve got nothing against him wearing branded merchandise, I just don’t have a closet full of cartoons for him to choose from. However, I do have a Cricut full of Disney cartridges and Design Dye!
step one: prep your fabric surface

I already had a plain white Tshirt in J’s closet that he’s never worn, so I selected that for my project. Using the Fabric Prep solution, I liberally sprayed the front of the shirt from the collar to about midway down the shirt.
I had already browsed through my collection of Disney cartridges for my Cricut and settled on an image from one of J’s other favorite movies, Finding Nemo.

Using the Best of Pixar cartridge, I selected a cute image of little Nemo and laid the orange Design Dye paper FACE DOWN on my cutting mat. This way the image would show correctly for the iron-on. For the sake of ease, I left out Nemo’s black embellishments (except for his eyes), and opted to only cut out the orange portions. On a white T-shirt, I figured he’d be obvious enough.
step two: cut your image


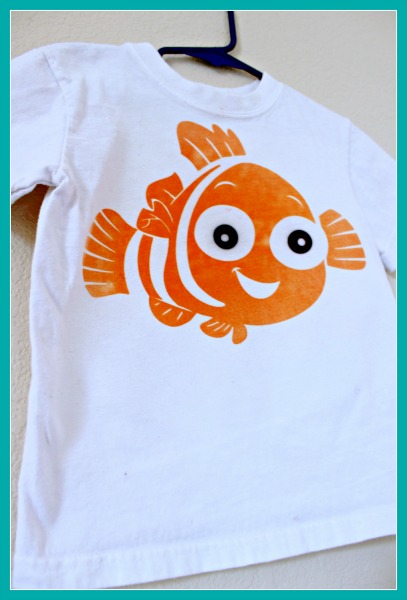
Isn’t he cute??
step three: iron on your design

The paper cut beautifully on the vinyl setting – no tearing or rough cuts. I easily peeled my Nemo pieces from my mat and set them aside while I warmed up my iron. The iron needs to be DRY, and set to the Linen/Cotton setting.
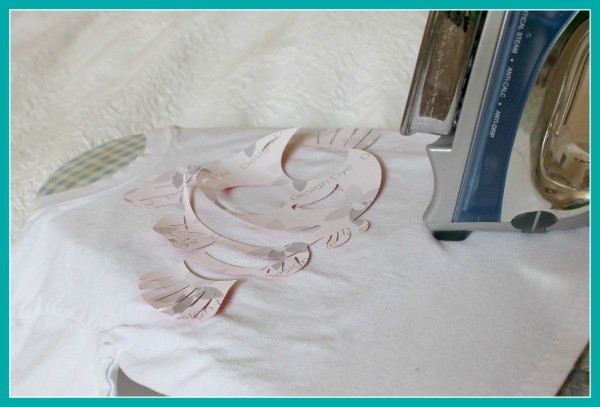
The instructions call for ironing the design onto a “single layer” of your chosen fabric. I interpreted that to mean I needed a buffer between the front of my tee and the back, so I fit it onto our little tabletop ironing board so only the front of the shirt would be treated. It felt a little stiff from the Fabric Prep, but I assume that’s the norm. I spread Nemo out on top, dye-side down, and laid one of the many tissue paper sheets on top.
The instructions call for you to move the dry iron slowly over the design for about 30 seconds. I followed the slowly part, but I admit to not keeping time. I probably went a bit longer, actually, but I didn’t have any issues with scorching or burning.

I stopped frequently to peel off a corner or two of the design and check my progress. Because my shirt was cotton, which takes longer to dye according to the instructions, I felt a few excess pass-overs with the iron were needed to get the rich, bright color Nemo deserved. I started to notice a neat tracking method for the darker areas as portions of the paper darkened under the iron. This made it super easy to just go over the areas not getting enough heat, like his fins. (You can kind of see in the photo below, how Nemo’s mouth and lower half look more orange through the paper than the rest of him.) Also, the tissue paper sheets included in the Design Dye kit were the perfect size to cover my whole image. (And – doy – that makes sense, since they are the same size as the colored papers. Sigh.)

The nice thing about these papers is that it is SO EASY to peel up, peek at your color saturation, and continue on if you don’t think it is dark enough! I was mildly concerned about scorching it, so I sort of preemptively changed out my tissue papers after a few minutes, but I probably didn’t need to. There were no signs of scorching, I just chose to be proactive. Besides, they give you A LOT of them.

After a grand total of about an hour – which included a few detours to Facebook and Words With Friends – I was done with my shirt!! All of this while my son was on his nap, even! For the sake of a true, full on review, I decided I also needed to wash the shirt and check the color-fastness. So that added an hour. But still!!
step four: proudly display!!

The other great thing about Design Dye is that it isn’t strictly for fabric! You can use it on practically any other medium, including wood and canvas. You can also iron Design Dye onto a third party, like a leaf or a doily, and iron THAT to your medium for some funky patterns! It’s pretty clear that there’s little you can’t do with Design Dye, and I will definitely be linking future posts here so you can see what else I’ve concocted with it!
This post has been linked to Funky Polka Dot Giraffe, Romance on a Dime, The Blackberry Vine, Homework, Mamal Diane, PJH Designs, Powerful Mothering, and Craftastic Moms.

