PSST – I use affiliate links on my website, from Amazon as well as others – this means if you click my links, I may earn a little money at no cost to you! As an Amazon Associate I earn from qualifying purchases. I appreciate your support of my blog, and if you have questions, you can see my disclosure policy here. Thank you!
It’s time for the Monthly Destash! This month, I sort of cheated. This month, instead of tackling a fresh project, I finally finished something I started THREE YEARS AGO.
Yes, that’s right – three years.

Every month a group of bloggers are challenged by me to create a new craft or project from their own stash of goodies! Everyone is allowed a $10 allowance for necessities to complete their project, but the bulk of it must be created from their own stash of goodies.
⬇️ Check out some awesome creations you might be able to make from your own stash! ⬇️
#CraftRoomDestashChallenge
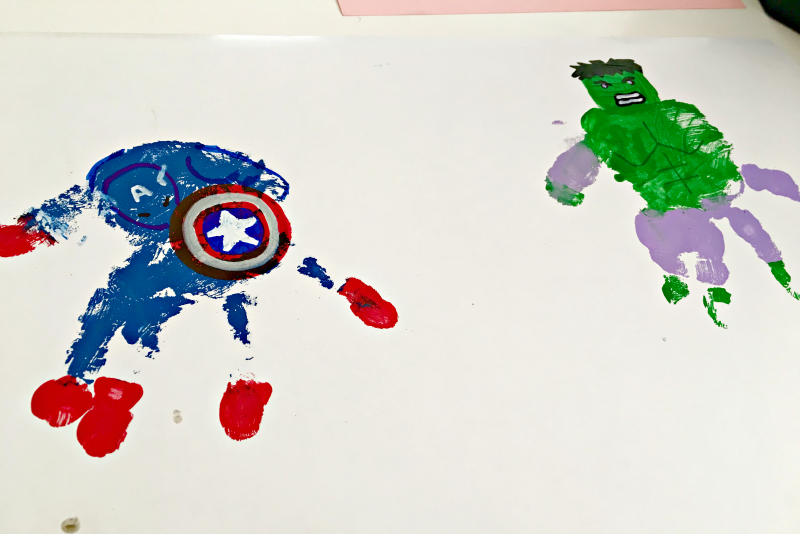
Back when my oldest was a preschooler obsessed with the Avengers, I had the grand plan to immortalize his tiny hands as his favorite superheroes. I took his handprints in themed colors, stashed them on cardboard, and fully intended to frame them as a comic-book-inspired art piece. But of course, life happened, as it tends to do. The adorable handprints sat tucked away, waiting for their moment to shine.
Fast forward to now: he’s six, his interests have expanded, but superheroes are still his best pals, and those tiny prints are a precious memory frozen in paint. So I dusted off the stash and finally brought the project to life – and I’m soooo glad I did.
Let me show you how we made this super fun superhero handprint art together – and don’t miss the FREEBIE I made you at the end of the post!

Gathering Your Materials
I used shadow boxes (pretty sure they were from Michaels) for a bolder display than basic frames. If you’re a teacher or mom with a craft stash, this is the perfect time to shop your own supplies. Here’s what I pulled together:
- Tape or adhesive
- Shadow box frames or regular picture frames
- Pre-painted handprints (or fresh ones if you’re starting now)
- Paint pens or Sharpies for details
- Cardstock or the frame’s original backing paper
- Ink pads or paint for comic-style backgrounds

Choosing Your Superheroes & Colors
Now for the messy part – the fun starts with color!
Look at pictures of your child’s favorite Marvel characters for reference and paint their hands accordingly. For Captain America, I did red and blue. Iron Man? Rich red (for now). Hulk got green and purple, and Spider-Man was back to red and blue. You can Google comic images for inspiration on where to place each hue on their fingers and palms.

Adding Character Details
Once the hand prints were dry, it was time to transform them into superheroes! Using a combination of Sharpies and paint pens, I started drawing faces and emblems to better outline the hand prints into their alter egos.
This step is pure creative freedom, btw – you can copy my versions, trace printed icons, or sketch your own emblems. It’s not meant to be perfect!

The best art is imperfect, in my humble opinion!
If you’re doing this with a class or multiple kids, it’s fun to set up a little “design station” with character printouts and let each child choose which hero their handprint will become. (If you notice in the picture below, we toyed for a hot minute with black for Black Widow, but decided that was too hard to “transform”.)


Building the Comic Book Background
Here’s where the art lesson vibe really comes in. Using plain paper, (or you can flip the frame’s backing to the blank side) create a comic-book-style backdrop. I used a stencil from my stash (similar to this one) that reminded me of classic comic panels.

I pulled out my old stash of ink pads and got to work. I alternated colors on each page, red and yellow for one and blue and green for another. Once the backgrounds were dry, I taped the cut out hand prints on them and popped them back in their frames.
Framing & Displaying
Just like me, you can pop the finished superhero handprint art into your shadow box frames, stand back, and admire. The layered effect of the handprint heroes on bold backgrounds looks like something you’d see at a quirky art fair – but it’s your kid’s hand captured in time.
This project isn’t just a cute craft. It’s a keepsake. A time capsule. And a GREAT conversation starter when friends see it hanging in your hallway!


Tips for Moms & Teachers
Thematic Sets: Use the same idea for other themes; Pokémon, Disney characters, princesses, or holiday icons.
Batch It: Do all the handprints in one session, then finish the detailing and backgrounds later.
Digital Option: Scan the finished handprints and turn them into printable cards or posters for family.
PSST – I made you some easy-to-follow guides and printable backdrops, in case you didn’t want to DIY it ALL!
So what do you think of my superhero hand print art project? It’s nice to have a forgotten project all sewn up!
Don’t forget to check out all the other great crafty de-stash projects in the group!


Super cute idea! I bet they loved them!