When we bought our house, there were a few things that drew us in right away. I loved the open concept between the kitchen and living room, the large bedroom sizes, and the overall spaciousness. And let’s not forget the massive, unfinished basement—one day I’ll get around to turning it into something amazing, but for now, the perfect cozy playroom I created for J down there will have to suffice.

We moved in with only a few months left before the birth of our second son, so I made it a point to tackle the things that required the least amount of cash (if not work) first. That meant painting, mostly. Updating the powder room, laundry room, and nursery were quick wins I could knock out before the baby.
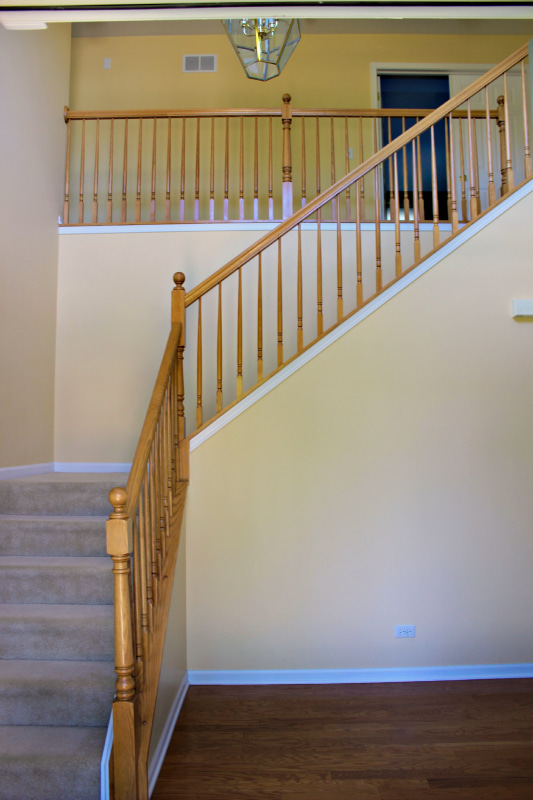
What I wanted to tackle super early and didn’t was our foyer – and the boring oak stairs.

Our foyer and staircase looked exactly how you’d picture a builder-grade staircase to look: basic, plain, and a whole lot of oak. I knew updating the staircase would be a serious project, and at eight months pregnant, the idea of sanding and staining stairs just wasn’t happening.
It’s funny, because I still managed to paint the front room two days before giving birth—don’t ask me to explain it.
Bringing in the Pros for a Little Extra Flair
Before I was willing to go full DIY on the stairs, we brought in a contractor to install board and batten up the foyer walls. I absolutely loved the idea of adding some character to the foyer, but precise measurements and cutting? Not my idea of a fun time.
I don’t math.
When we priced out having the foyer repainted to get rid of the yellow (cuz I HATED the yellow) vs having the board and batten installed, we decided to go with the board and batten first.


A sneak peek of the contractor’s addition to the space:

How much prettier does this look??
As much as I loved the board and batten addition, those damn oak stairs have been bugging me the entire time. With the advent of summer this year, I wanted a fresh update, and I was finally ready to tackle the stairs.

The DIY Plan: Dark Rails and White Spindles
I had a clear vision for the staircase: I wanted dark rails to contrast against crisp, white spindles. I knew I could use chalk paint for the white spindles, but the dark wood rail was a bit trickier. That’s when I remembered my favorite gel stain: Java Gel Stain. This stuff is magic for creating rich, even color on wood surfaces, so it was a perfect fit for the railing.

I knew exactly what I wanted for the new look, a contrast of dark rails and white spindles. I knew I could get the white done with chalk paint, so that was no big deal. For the dark, I was unsure of what to do, until I remembered my favorite stain, Java Gel Stain.
What I Used:
- Java Gel Stain (in my tried-and-true “Java” shade)
- DecoArt Chalk Paint in “Everlasting” for the spindles
- Foam brushes for easy application and control
- Painter’s tape (lots of it)
- Polyurethane finish to seal everything up
Staining the Rails
Staining the rails became a nightly ritual. Since this was a slow and steady kind of project, I worked on it after the kids were in bed and the day job was wrapped up. I used foam brushes for better control, which meant fewer drips and less mess overall. Java Gel Stain goes on smoothly, but multiple coats are key to getting that rich, dark color. So yes, it took a while—but it was worth every late-night session to see those dull oak rails transform into something bold and elegant.
Goodbye blonde!!#dreamhome #staircase #stained #diy post to come!! A photo posted by Megan – C’mon Get Crafty (@cmongetcrafty) on
Taping and Painting the Spindles
Once the rails had the depth I wanted, I moved on to the spindles. This step involved some serious patience because, as any DIYer knows, taping off dark-stained areas is critical if you don’t want a smeary mess. After carefully taping off the rails and baseboards, I got to work with the DecoArt Chalk Paint in Everlasting.
Chalk paint is a DIY lifesaver because it requires no priming, which was fantastic for the spindles. I worked in thin coats to get a smooth, even finish, but it took several coats to cover up that old oak. By the time I was done, the contrast between the dark rails and white spindles was everything I’d hoped for.
A photo posted by Megan – C’mon Get Crafty (@cmongetcrafty) on
Final Touches (And a Near-Birthday Deadline)
As with any DIY project, life didn’t stop just because I had a staircase makeover in progress. We were quickly approaching H’s first birthday, and I realized I still hadn’t added the polyurethane finish. I had to hold off on that final protective layer until after the party, but once I added it, the whole staircase had a gorgeous, polished look that truly transformed the space.
I’m in love.

Seriously, I still can’t believe this transformation.

The contrast of the dark rails against the white spindles and board and batten just makes me super happy.

The Finished Look: Fresh, Bright, and So Worth It
I’m thrilled with how this project turned out. The dark-stained rails, white spindles, and board and batten walls bring a fresh, sophisticated feel to the foyer that’s so much more “us.” Plus, this summer update was the perfect way to brighten up the space. Every time I walk through the front door, I can’t help but smile. This DIY was a lot of work, but seeing the transformation makes every late night worth it.
This post is part of the Pinterest Party Summer Fun Blog Hop. The Pinterest Party is a group that helps people grow their Pinterest following. Find other posts in this blog hop below:
- How to Hunt for and Find Antiques – Tips by Paula Atwell
- From Sea To Shore Collection by Vinn Wong
- Huckleberry Ice Cream by Corrinna Johnson
- Summer Garden Salad with Lemon Dill Dressing by Kristen Carrasco
- Campfire Skillet Apples by Ann-Marie Baker Rohe
- Summer Staircase Refresh by Megan Chamberlin (that’s me!)
What projects have you been working on this summer?

You Might Also Like


Hi! Looks beautiful! I plan on taking on the same project.
Question: Did you sand everything down prior to painting?
By hand or with sander?
Hi there! I actually did not sand much at all, a very light rub down with sandpaper sheets here and there, that is all! I used the chalk paint as the primer for the spindles, and LOTS of coats of the gel stain on the handrails.
Nice, it almost looks black in the picture. I’m impressed that you didn’t do any sanding.
Hi !
I’m impressed with the chalk paint. Could you detail more on how many coats you used ? How did you finish it? Do you have to wax over top? I want to do mine all white but I’m worried about hands being all over the rail. In time will I have to do this all again? I have dirty polyurethane showing now. Do I need to sand it off?
Your pics are gorgeous! Thanks for sharing!
Thank you!! I did not do any sanding, the chalk paint takes that step out of the process. I did have to do several coats to get a nice cover of white. If you are doing all white, you will definitely want to seal with a poly on top. Wax is a possibility but a railing is touched often and the wax I feel like would not hold up over time. If you seal it with several coats of poly I would think it would last! Thanks for visiting and good luck!
I’m looking to do the same project. Luckily I only have to update the handrail. Did sand the handrail at all before staining – you mention LOTS of coats. Does that mean 5-6 or are we talking over 10? Did you research painting vs. staining?
Hi Alicia,
I did no sanding at all on this project. And I while I didn’t count specifically, I would say definitely over ten. It was time consuming for sure, but I got exactly the dark finish I wanted, and I didn’t want to paint. You could definitely chalk paint it faster and still skips the sanding if you wanted to go that route!
Hi. This looks great and almost exactly what I would like to do. I hate sanding so I like the idea of chalk paint and the stain. I am wondering, how well did the gel stain take to the wood? Did you sand lightly? Also, How did you tape off the top of the spindles beneath the hand rail? I was going to do the white spindles first, then tape them and then do the stain, but sounds like you did it the opposite. How did you tape it so it was so clean looking? Thanks.
Thanks! I did the lightest of sanding by hand, and then it was just multiple layers of the gel stain. Honestly though, I’ve used the same stain on things I HAVE sanded, and I think it works just as well either way.
Does having the rails a dark stain not annoy you with your light colored hardwood floors ? Or do you intend to replace those to match? We have the opposite . Light railings and dark flooring and it’s driving me insane hence my search for tips on repainting and staining !
It did annoy for a bit, but we just had our floors redone to a darker, wider plank, and now it is gorgeous! I knew we would eventually, so it was just all about stages!
How much Java stain did you need to do this entire project? You show 1/2 pint but with 10 coats did you need more than that 1/2 pint?
I believe I went through 2-3 cans in all, BUT that included retouching because I (stupidly) did not poly right away.
LOVE THIS!! I am planning to attempt the same on my oak handrail. Luckily, my spindles are already white. How long did you let the stain dry in between coats? And could you show me a pic of the type of brush you used? Thank you so much for sharing!
Hi! I used foam brushes. They worked the best for me without the issue of leaving bristles behind. Be warned, you will use a LOT of them! I don’t recall how long I let dry, unfortunately. But you should be able to tell by smearing if it is too tacky or wet.
Hi Megan. I am wanting to do this to my oak stained stairs and they have clear on top of it. Are you saying that you didn’t sand yours at all? I can’t find your Instagram post